Create React App
What is CRA?
Create React App (CRA) is built buy facebook and it is meant for:
Learning React in a comfortable and feature-rich development environment (good errors! warnings, notes about best practices, hot reloading, zero configuration)
Starting new single page applications
Creating Examples with react for your libraries and components
CRA isn't the best choice for:
a sandbox where you just want to try some samples out
A mostly static site (portfolio, blog) - try Gatsby!
Server side rendering (yes! With a front-end framework! What is next? Cats and dogs being friends?!) - look into Next.js
Creating a React App
 CODING TIME
Getting Ready
We will be using the Node package manager (npm), so you will need to have Node installed on your computer. To check if you have Node installed, run this command in your terminal:
node -vIf you have Node installed, this command will return a version number, like v12.18.1.
If it’s not already installed, follow the steps in Setting Up Node Locally before moving on.
When you install Node, you automatically get npm installed on your computer as well. However, npm is a separate project from Node.js, and tends to update more frequently. As a result, even if you’ve just installed Node (and therefore npm), it’s a good idea to update your npm. Luckily, npm knows how to update itself!
To upgrade to the latest version of npm on *nix (OSX, Linux, etc.), you can run this command in your terminal:
To upgrade on Windows, follow the steps found in the npm documentation.
1. Setting Up the Boilerplate Application
It is possible to manually create a React app, but Facebook has created a Node package create-react-app to generate a boilerplate version of a React application.
Besides providing something that works out-of-the-box, this has the added benefit of providing a consistent structure for React apps that you will recognize as you move between React projects. It also provides an out-of-the-box build script and development server.
We will use npx, a package runner tool that comes with npm 5.2+ and higher, to install and run create-react-app. This will ensure that the latest version of create-react-app is used.
Open up your terminal.
If you’ve previously installed
create-react-appglobally vianpm install -g create-react-app, it is recommended that you uninstall the package first. In your terminal run these commands:If you’ve never installed
create-react-appbefore, you can simply run this command:If you have Yarn installed,
create-react-appwill use it by default to create new projects. If you would prefer to use npm, you can append--use-npmto the creation command. It will look like this:
Feel free to replace cra with whatever name you want like myfirstreact, as long as it doesn’t contain capital letters
Upon completion, you will get some quick tips on how to use the application:
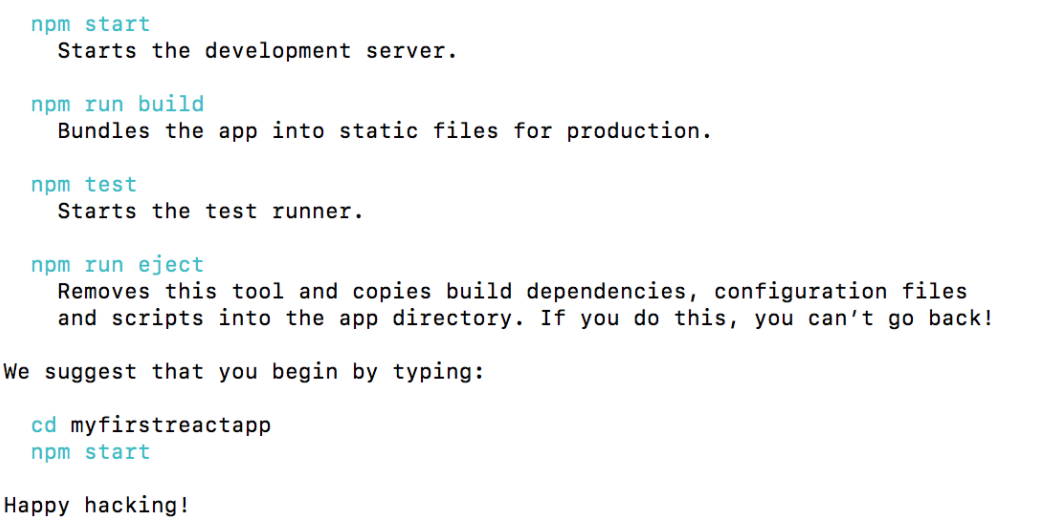
Once it has installed. Run the following commands in your terminal:
cd crarm -rf .git- because we are in the class repository - no git reps inside other git repos!in the other open tab
code .
Change directories into the app you just created, and open the app in the text editor of your choice. You should see the following file structure:
If we take a look at the folders:
What do the different files mean and do?
package.json- This file outlines all the settings for the React app.nameis the name of your appversionis the current version"private": trueis a failsafe setting to avoid accidentally publishing your app as a public package within the npm ecosystem.dependenciescontains all the required Node modules and versions required for the application. In the picture above, you’ll see six dependencies. The first three, as you may have guessed, are for the purpose of testing. The next two dependencies allow us to usereactandreact-domin our JavaScript. Finally,react-scriptsprovides a useful set of development scripts for working with React. In the screenshot above, thereactversion specified is^16.13.1. This means that npm will install the most recent major version matching 16.x.x. In contrast, you may also see something like~1.2.3in package.json, which will only install the most recent minor version matching 1.2.x.scriptsspecifies aliases that you can use to access some of the react-scripts commands in a more efficient manner. For example, runningnpm testin your command line will runreact-scripts test --env=jsdombehind the scenes.You will also see two more attributes,
eslintConfigandbrowserslist. Both of these are Node modules having their own set of values.browserslistprovides information about browser compatibility of the app, whileeslintConfigtakes care of the code linting.
node_modules- This directory contains dependencies and sub-dependencies of packages used by the current React app, as specified by package.json.If you take a look, you may be surprised by how many there are.
Running
ls -1 | wc -lwithin the node_modules/ directory will yield more than 800 subfolders. This folder is automatically added to the .gitignore for good reason! Don’t worry, even with all these dependencies, the basic app will only be around 50 KB after being minified and compressed for production.
package-lock.json- This file contains the exact dependency tree installed in node_modules/. This provides a way for teams working on private apps to ensure that they have the same version of dependencies and sub-dependencies. It also contains a history of changes to package.json, so you can quickly look back at dependency changes.public- This directory contains assets that will be served directly without additional processing by webpack. index.html provides the entry point for the web app. You will also see a favicon (header icon) andmanifest.json. - The manifest file configures how your web app will behave if it is added to an Android user’s home screen (Android users can “shortcut” web apps and load them directly from the Android UI). You can read more about it here.src- This contains the JavaScript that will be processed by webpack and is the heart of the React app. Browsing this folder, you see the main App JavaScript component (App.js), its associated styles (App.css), and test suite (App.test.js). index.js and its styles (index.css) provide an entry into the App and also kick off the registerServiceWorker.js. This service worker takes care of caching and updating files for the end-user. It allows for offline capability and faster page loads after the initial visit. More of this methodology is available here.
As your React app grows, it is common to add a components/ directory to organize components and component-related files and a views/ directory to organize React views and view-related files.
3. Starting the React App Development Server
Run the following code in the terminal: npm start
As was stated in the success message when you ran create-react-app, you just need to run npm start in your app directory to begin serving the development server.
It should auto-open a tab in your browser that points to http://localhost:3000/ (if not, manually visit that address). You will find yourself looking at a page resembling the following image:

As stated, any changes to the source code will live-update here. Let’s see that in action:
Leave the current terminal tab running (it’s busy serving the React app) and open src/App.js.
You’ll see what looks like a mashup of JavaScript and HTML. This is JSX, which is how React adds XML syntax to JavaScript.
It provides an intuitive way to build React components and is compiled to JavaScript at runtime. We’ll delve deeper into this in other content, but for now, let’s make a simple edit and see the update in the browser.
Remove the text inside the
ptag and put some of your own words like:Save the file and look at the browser again:

Let's remove all the create react app showcase stuff and rewrite our component to be a function:
Your final App.js code should look like this:

Now your browser should show this:

🏆CODING TIME COMPLETED
Last updated